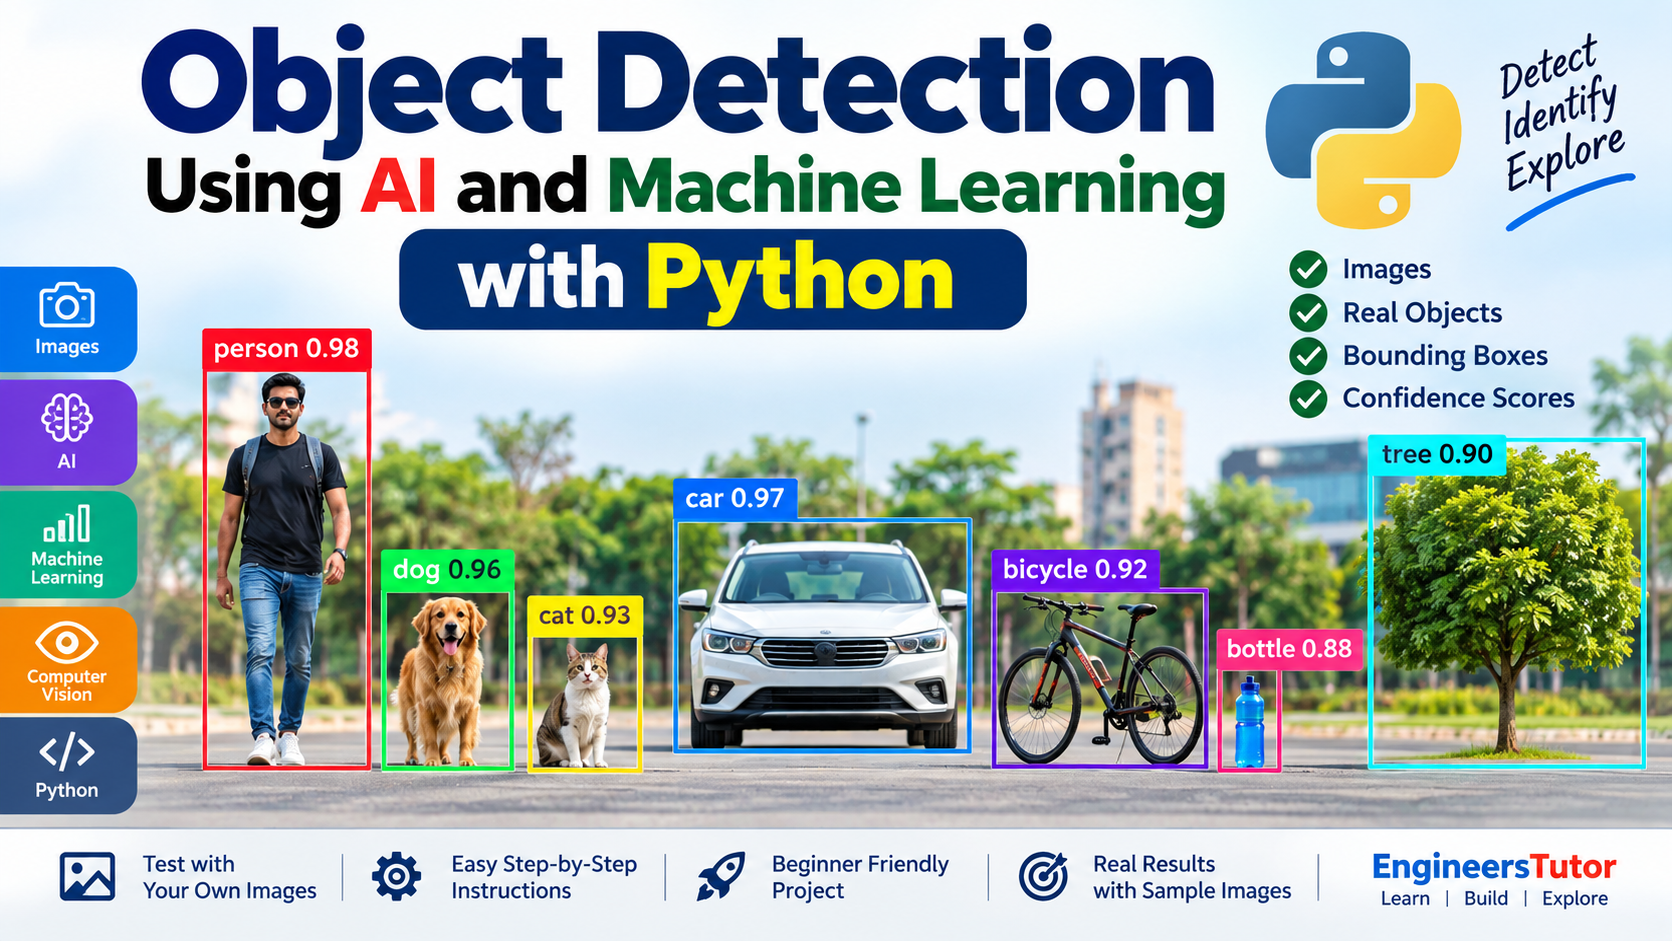
Object Detection Using Python, AI and Machine Learning
🤖 1. Introduction
Object Detection is a practical application of Artificial Intelligence (AI) and Machine Learning (ML). In this project, we will build a Python application that can examine an image and identify objects present in it.
🔍 What will this project do?
- 🖼️ Analyze images and look for recognizable objects.
- 🎯 Detect objects and mark their locations in the image.
- 🧠 Use a pre-trained AI/ML object detection model to perform the detection.
- 🐍 Use Python to build and run the application.
- 📦 Display the detected objects together with their bounding boxes and labels.
💡 Tip: Try the program with different images. Seeing how the model responds to real images is often the most interesting part of learning object detection.
In this project, you will build a simple Object Detection application using Python. The application will analyze an image, identify objects that it recognizes, and display the results directly on the image.
- 🖼️ The program reads an input image.
- 🧠 The AI model analyzes the image.
- 🔎 Recognized objects are detected.
- 📦 Bounding boxes are drawn around the detected objects.
- 🏷️ Object names and detection information are displayed.
Instead of only reading about object detection, you will be able to run the application and see the detected objects yourself.
Once you see the result, you can experiment with your own images and observe which objects the AI model can recognize.
💻 3. Project Requirements
Before running the project, make sure your computer has the following:
🧰 Software Requirements
- 🪟 Windows
- 🐍 Python
- 📝 VS Code or Command Prompt
- 📦 Required Python packages
- 🧠 Object detection model/files included with the project
If multiple Python versions are installed on your computer, specify the Python version when running the program. For this project, the instructions below use Python 3.12, which was used to test the project.
▶️ Run the application
Open Command Prompt in the project folder and run:
py -3.12?
When more than one Python version is installed, the command py -3.12 explicitly tells Windows to use Python 3.12. This helps prevent the program from accidentally running with another Python installation.
Before installing the Python package, download the project files provided with this tutorial and place them in a convenient location on your computer.
Click the button below to download the complete Object Detection project as a ZIP file.
After downloading the ZIP file, extract it and open the project folder. You should see the Python program and the sample images provided with this project.
├── object_detection.py
└── sample_images
Make sure the Python program is present in the project folder and that the sample images are available inside the sample_images folder. Keep the folder structure unchanged unless the instructions specifically ask you to move a file.
🐍 5. Check Python Installation
Before installing the required packages, let’s confirm that Python 3.12 is available on your computer.
▶️ Step 1: Open Command Prompt
Open Command Prompt and run the following command:
✅ Expected Result
The exact last digits may be different. For example, Python 3.12.6 is also a valid result.
The command py -3.12 specifically checks Python 3.12. This is useful if Python 3.14 or another version is also installed on your computer.
This Object Detection project uses the Ultralytics package to load the YOLO model and perform object detection. Open Command Prompt and install the required package using the command below.
py -3.12 -m pip
instead of simply pip.
This ensures that the package is installed for Python 3.12.
The Ultralytics package provides the YOLO model
(yolo26n.pt)
and the necessary components to perform AI-based object detection.
It will automatically install its required dependencies.
The project also uses the following Python standard library modules, which are included with Python and do not normally require separate installation:
-
tkinter– for the file selection dialog -
pathlib– for handling image file paths -
os– for opening the output image automatically
When you run the program for the first time, the YOLO model file
(yolo26n.pt)
may be downloaded automatically.
This can take some time depending on your internet connection.
Subsequent runs should be faster.
Once the package is installed successfully, you can proceed to the next step: opening the project folder and running the Object Detection application.
Before running the application, it is a good idea to check that the Ultralytics package was installed correctly.
If the package is installed, its package information and installed version will be displayed in the Command Prompt.
You can also check whether Python can import the Ultralytics package without producing an error:
If you see Ultralytics imported successfully without an error message, the main package installation is ready.
The project also uses tkinter, pathlib, and os. These are Python standard-library modules and normally do not require separate installation with pip.
If the import test displays an error, check the installation command and make sure that Ultralytics was installed for Python 3.12.
📂 8. Open the Project Folder
Now open the folder where you extracted the Object Detection project files. We will open Command Prompt directly in this folder.
🖱️ Follow these steps:
- Open the Object Detection project folder in File Explorer.
- Click once inside the address bar at the top of File Explorer.
- Type:
- Press Enter.
A Command Prompt window will open with the project folder already selected as the current location.
🖥️ Example
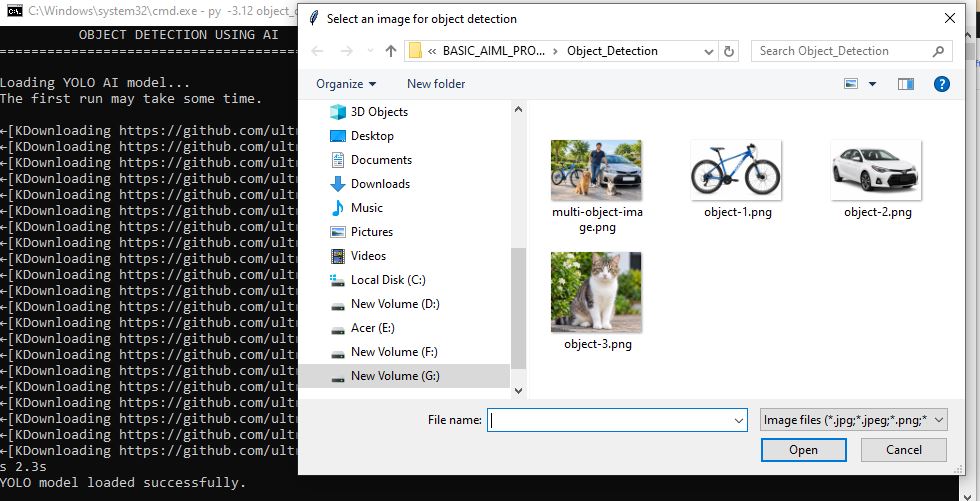
Command Prompt opened directly in the project folder.
You do not need to manually navigate through folders using Command Prompt. Opening cmd from the File Explorer address bar takes you directly to the correct folder.
🚀 9. Run the Object Detection Program
Everything is now ready. Let’s run the application and see Object Detection in action!
▶️ Step 1: Run the program
In the Command Prompt opened in your project folder, enter the following command:
Press Enter to start the program. Wait a few moments while the application loads the object detection model and processes the image.
The detected objects should now appear in the output, with bounding boxes and object labels drawn around the objects identified by the model.
📸 Object Detection Output
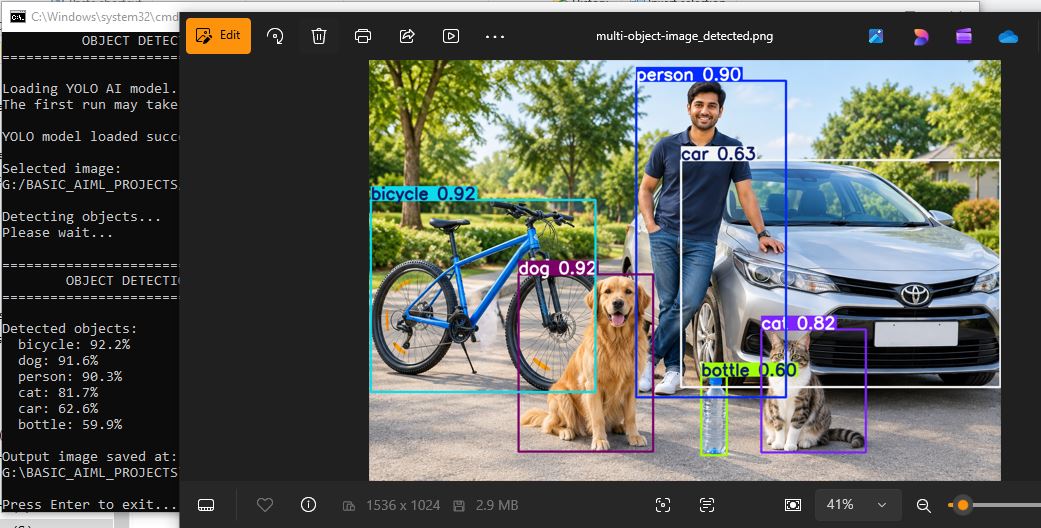
Example output from the Object Detection application.
Try the program with different images and observe which objects the model can detect. Once you have tested the application, we can look at how the detection process works internally.
🧪 10. Test the Project
Now comes the most interesting part — experiment with the application yourself! Instead of immediately studying how the model works internally, try different images and observe the detection results.
Run the program with different test images and check whether the expected objects are detected. Pay attention to the object name, bounding box, and confidence value shown in the output.
🖼️ Try these test images
- 🧑 Person
- 🚗 Car
- 🚲 Bicycle
- 🍾 Bottle
- 🐕 Dog
- 🐈 Cat
- 🐦 Bird
- 🌳 Tree
- 🌍 Multi-object image
- Select one of the test images.
- Place the image in the location expected by the program.
- Run the Object Detection program.
- Observe the detected objects and their bounding boxes.
- Repeat the experiment with another image.
- Which objects were detected?
- Were the objects correctly identified?
- Where were the bounding boxes placed?
- Did the confidence value change between images?
- How did the model perform when several objects appeared in the same image?
After testing individual objects, try an image containing multiple objects. This gives you a better idea of how an object detection model can locate several objects within the same image.
📸 Test Result
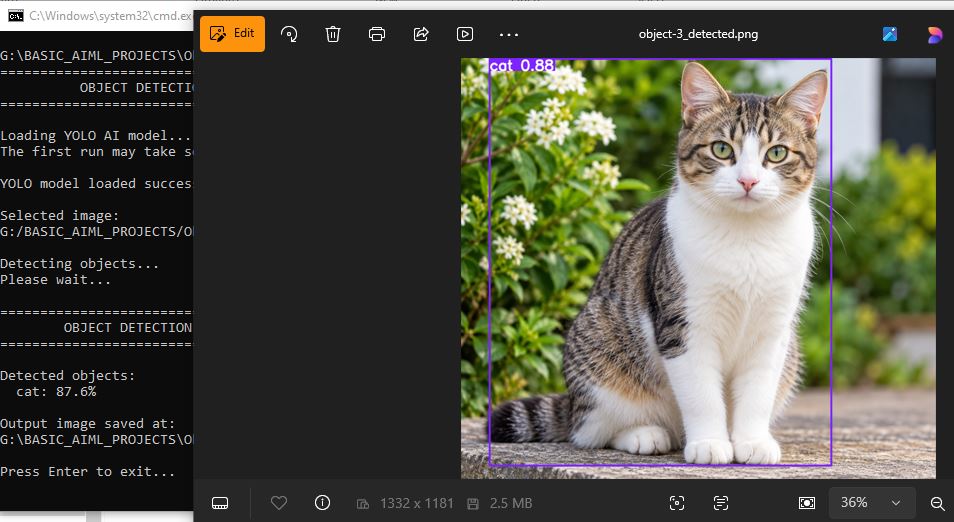
Example result obtained while testing the Object Detection project.
Once you have experimented with the application, let’s take a closer look at how the object detection process works.
🧪 Test the Object Detection Application
Input: Use a suitable image containing a person.
Action: Run the Object Detection program and observe the output.
Observe: Check whether a bounding box and the corresponding object label appear around the person.
Input: Use the car test image.
Output: Observe whether the car is detected and marked with a bounding box.
Input: Use the bicycle test image.
Output: Check whether the bicycle is correctly identified and highlighted.
Input: Use the bottle test image.
Output: Observe whether the bottle is detected and enclosed by a bounding box.
Try the dog, cat, or bird images supplied with the project.
Check which animals the model recognizes and observe the bounding boxes and labels.
This is the most interesting test because several objects appear in the same image.
Use your multi-object image containing:
Run the program and observe how the model detects several objects in a single image.
- Is the object identified correctly?
- Is the bounding box placed around the object?
- What confidence value is displayed?
- Can the model detect more than one object at the same time?
📸 Multi-Object Detection Result
Example result showing multiple objects detected in one image.
A single image can contain one or many objects, and the model attempts to identify each recognizable object separately. Now that you have seen the results, let’s understand how the Object Detection process works.
🖼️ 11. Try Your Own Images
Now it is time to go beyond the sample images. Try the Object Detection application with images of your own.
Replace the sample image with an image of your choice and run the program again. Observe which objects the model recognizes and how they are marked in the output.
🔄 How to try another image
- Choose an image from your computer.
- Copy the image into the project folder or the image folder used by the program.
- If required, change the image filename in the Python program.
- Run the application again and examine the result.
🔬 Images you can experiment with
- 🏫 A classroom
- 🛣️ A street scene
- 👨👩👧 A family or group photo
- 🚗 A vehicle
- 🐕 Animals
- 🌍 An image containing multiple objects
Different images may produce different results. Look at the objects detected, the position of the bounding boxes, and the confidence values shown by the model.
The model may not recognize every object in every image. Detection results can vary depending on the objects present, their size, visibility, image quality, and the classes supported by the trained model.
Find an image containing several different objects and see how many of them the model can identify. This simple experiment is a great way to understand the practical side of AI-based object detection.
🧠 12. Understanding the Detection Result
You have already run the program and seen the detection results. Now let’s understand the main terms used to describe what you see on the output image.
📦 Bounding Box
A bounding box is a rectangle drawn around a detected object. It shows approximately where the object is located in the image.
🏷️ Object Label
The object label is the name assigned to an object detected by the model.
For example:
📊 Confidence Score
The confidence score is a numerical value that indicates how strongly the model supports a particular detection.
The confidence score is not a guarantee that the detection is correct. It is simply the model’s confidence value for that particular prediction.
When you look at an output image, think of it this way:
Together, these provide the main information about an object’s detection in the image.
Now that you understand the information shown in the result, we can take a brief look at what happens behind the scenes.
⚙️ 13. How the Program Works
You have already seen the application detect objects in images. Now let’s take a simple look at what happens inside the program.
The program receives an image that contains one or more objects that we want the model to analyze.
Python and OpenCV read the image and prepare it for processing by the detection model.
The pre-trained model analyzes the image and looks for objects belonging to the classes it has learned to recognize.
For each detected object, the model produces information such as its class and location in the image.
The program processes the model’s results and determines which detections should be displayed.
OpenCV draws rectangles around the detected objects and adds labels and other detection information.
Finally, the processed image is displayed so you can see the detected objects, their labels, and bounding boxes.
The program takes an image, sends it through a trained object detection model, receives the detected objects, and then uses OpenCV to present those results visually.
🐍 14. Important Parts of the Python Program
The complete Python program contains several lines of code, but you do not need to understand every line at this stage. Let’s look at the main parts that perform the object detection.
🧠 1. Importing the YOLO Model
The program uses the Ultralytics package to work with the YOLO object detection model.
This imports the YOLO class provided by Ultralytics so that the program can load and use a pre-trained YOLO model.
🧠 2. Loading the Object Detection Model
The program then loads the pre-trained YOLO model. In this project, the model file used is yolo26n.pt.
This creates the YOLO model object that will be used to analyze the input image and detect recognizable objects.
🖼️ 3. Selecting the Input Image
The program allows the user to select an image for detection. The selected image path is then passed to the YOLO model.
Here, image_path represents the path of the image selected for object detection.
🔎 4. Running Object Detection
The predict() method is the main part of the program that sends the image through the YOLO model. The model analyzes the image and produces detection results.
The returned results contain information about the objects detected in the image, including their locations, class names, and confidence values.
📊 5. Processing the Detection Results
The YOLO model returns detection results that contain useful information about the objects found in the image.
The program can use these results to determine the detected object class, its location, and its confidence value.
📦 6. Displaying the Detection Results
YOLO can generate an image containing the detected objects, bounding boxes, labels, and confidence values.
The plot() method creates an annotated version of the image with the detection results drawn on it.
Finally, the annotated image is saved or opened by the program, allowing you to see the detected objects, labels, bounding boxes, and confidence values.
You do not need to memorize these code sections. First understand the overall flow and then experiment with the program. You can return to the individual code blocks whenever you want to study them in more detail.
🔍 15. What Happens When an Object Is Not Detected?
Object detection does not always produce a detection for every object in an image. This is a useful opportunity to experiment with situations that make detection more difficult.
🧪 Try these difficult images
- 🔹 A very small object
- 🌫️ A blurry image
- 🌑 A dark or poorly illuminated image
- 📐 An object viewed from an unusual angle
- 👤 An object that is partially hidden
Run the program with these images and compare the results. You may find that some objects are detected while others are missed or receive lower confidence values.
The model may fail to detect an object when it is too small, partially hidden, blurred, poorly illuminated, difficult to recognize from the given viewpoint, or outside the object classes supported by the model.
If an object is not detected, first check the image and the model’s supported classes. An object can be clearly visible to a person but still be difficult for the trained model to recognize.
These experiments show an important practical point: AI-based object detection is not perfect. Its results depend on the model, the image, and the conditions under which objects appear.
📦 16. Packages and Modules Used in This Project
The project uses one main AI package along with a few built-in Python modules for handling the user interface, files, and output.
The main AI functionality is provided by
Ultralytics YOLO. The program loads the
YOLO model file and uses
model.predict()
to perform object detection on the selected image.
Ultralytics performs the AI-based detection, while tkinter, pathlib, and os help the Python program interact with the user and manage files and results.
🧠 17. AI and Machine Learning Behind the Project
The application you have just tested is based on Artificial Intelligence (AI) and Machine Learning (ML). At a high level, the object detection model analyzes an image and looks for objects it has been trained to recognize.
🔍 What is Object Detection?
Object detection is a computer vision task in which an AI model identifies objects in an image and determines approximately where those objects are located.
Unlike simple image classification, which may assign a label to an entire image, object detection can identify multiple objects and locate them using bounding boxes.
⚙️ Simplified Detection Process
The model identifies object classes such as person, car, dog, or bottle.
The model provides information used to determine where each detected object appears in the image.
A confidence value is associated with each detection produced by the model.
You do not need to study neural networks, tensors, training algorithms, or mathematical details to run this project. The practical experiments above give you the foundation needed to explore those topics later.
A separate article can explore the technology in greater detail, including how object detection models are trained and how they identify objects and their locations.
Suggested future article:
How Object Detection Works in AI and Machine Learning
🎯 18. Conclusion
In this project, we built and tested a simple Object Detection application using Python. We installed the required packages, ran the application, tested it with different images, and observed how the model identifies objects using labels, bounding boxes, and confidence values.
The best way to continue learning is to experiment with your own images. Try different scenes, compare the results, and observe where the model performs well and where it may miss an object.
You have taken a complete AI/ML project from installation → execution → testing → understanding. This practical experience gives you a starting point for exploring more advanced computer vision and object detection projects.
If you want to go deeper, the next step is to learn how object detection models are trained and how they identify objects and their locations.
🚀 19. Next Steps
You have now built, tested, and experimented with an AI-based Object Detection application. If you enjoyed this project, there are many ways to take it further.
💡 Projects you can try next
Start with images, then move to video, webcam detection, object tracking, and eventually custom object detection.
The easiest way to learn AI and computer vision is to build small projects, test them with different inputs, observe the results, and gradually make them more capable.