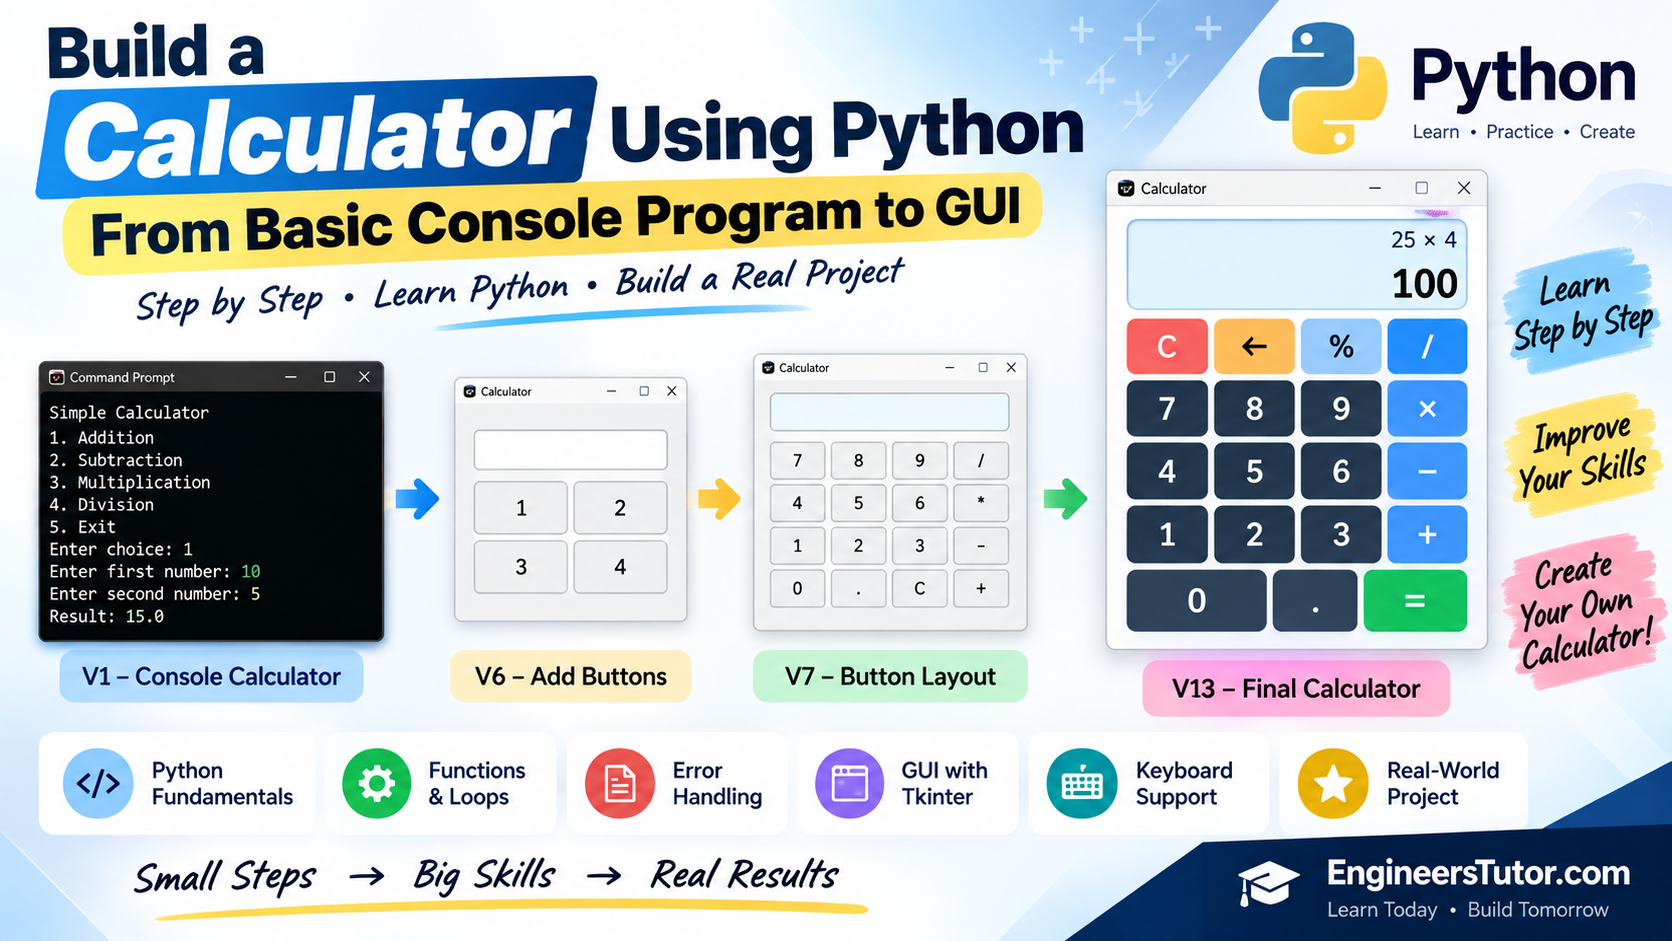
Build a Calculator Using Python — From Basic Console Program to GUI

In this project, we will build a calculator step by step using Python. We will begin with a simple console-based calculator and gradually introduce functions, error handling, and GUI programming with Tkinter. Each step builds on the previous one, allowing beginners to learn Python concepts while developing a practical application.

🧮 Step 1 — Basic Calculator
📄 File: calculator_v1.py
💡 What We Build

We begin with a simple console-based calculator. The user selects an arithmetic operation, enters two numbers, and the program displays the result. A while loop keeps the calculator running until the user chooses Exit.

🛠️ Skills Required
  • print() and input()
  • Variables and float()
  • Arithmetic operators: + * /
  • while loop
  • if, elif, else
  • break and continue
  • Comparison operators and basic error checking
🎯 What You Learn
You learn how basic Python statements can work together to create a useful and interactive program.
🚀 Project Progress: Console Calculator → Improved Calculator → GUI Calculator
🧩 Step 2 — Using Functions
📄 File: calculator_v2.py
💡 What We Improve

In Step 1, the calculator operations were written directly inside the main program. Now we make the program more organized by creating separate functions for addition, subtraction, multiplication, and division.

🛠️ Skills Required
  • Defining and using functions
  • Function parameters
  • return statement
  • Calling functions
  • while loop
  • if, elif, else
  • Lists
  • break and continue
🎯 What You Learn
You learn how functions divide a program into smaller, reusable parts, making the calculator easier to read, maintain, and extend.
🚀 Project Progress: Basic Calculator → Functions → Improved Calculator → GUI Calculator
🛡️ Step 3 — Handling Invalid Number Input
📄 File: calculator_v3.py
💡 What We Improve

The calculator can now handle invalid number input. If the user enters text such as abc instead of a number, the program displays a helpful error message instead of stopping.

New Concept: try / except is used to prevent the program from crashing when invalid input is entered.
🛠️ Skills Required
  • All concepts from Step 2
  • try and except
  • ValueError
  • Basic exception handling
  • float()
  • continue
🎯 What You Learn
You learn how to handle common input errors and make a Python program more reliable and user-friendly.
🚀 Project Progress: Basic Calculator → Functions → Error Handling → GUI Calculator
🖥️ Step 4 — Create the GUI Window
📄 File: calculator_v4_GUI.py
💡 What We Build

Now we move from the console to a Graphical User Interface (GUI). Using Python’s built-in Tkinter library, we create the main window for our calculator.

At this stage, the window is only the foundation of the calculator. The buttons and display will be added in the following steps.

🖥️ New Concept: Tkinter allows Python programs to create windows, buttons, labels, text fields, and other GUI components.
🛠️ Skills Required
  • import
  • Tkinter library
  • tk.Tk() — create the main window
  • Variables
  • window.title()
  • window.geometry()
  • window.mainloop()
🎯 What You Learn
You learn the basic structure of a Tkinter GUI application and how to create and display a program window.
🚀 Project Progress: Console Calculator → Functions → Error Handling → GUI Window → GUI Calculator
🖥️ Step 5 — Add the Calculator Display
📄 File: calculator_v5_GUI.py
💡 What We Build

The calculator window now gets an Entry widget. This widget will act as the calculator’s display area, where numbers and calculation results can later be shown.

New Concept: An Entry widget provides a single-line area for displaying or entering text. Here, we will use it as the calculator display.
🛠️ Skills Required
  • Tkinter
  • Entry widget
  • Widget configuration
  • font
  • justify
  • bd (border width)
  • pack()
  • Keyword arguments
🎯 What You Learn
You learn how to create, configure, and position a Tkinter input/display area inside a GUI window.
🚀 Project Progress: GUI Window → Calculator Display → Buttons → Button Actions → Full Calculator
🔢 Step 6 — Add Calculator Buttons
📄 File: calculator_v6_GUI.py
💡 What We Build

We now add the first calculator buttons. Four buttons — 1, 2, 3, and 4 — are created and arranged in rows and columns using Tkinter’s grid() layout.

⚠️ Note: The buttons are only part of the GUI at this stage. They do not perform any calculation yet. Their actions will be added in a later step.
New Concepts: Button widgets, Frame containers, and grid() help us create an organized calculator layout.
🛠️ Skills Required
  • Tkinter Button
  • Tkinter Frame
  • grid() layout
  • Rows and columns
  • Widget properties
  • pack()
🎯 What You Learn
You learn how GUI widgets can be organized into a structured layout using rows, columns, frames, and the grid() method.
🚀 Project Progress: GUI Window → Display → Buttons → Button Actions → Operations → Complete Calculator
⚙️ Step 7 — Create the Complete Button Layout
📄 File: calculator_v7_GUI.py
💡 What We Improve

Instead of creating every calculator button separately, we store the button layout in a list. Nested for loops then create and arrange the buttons automatically.

🚀 Important Programming Idea: We are no longer repeating the same code for every button. Instead, data + loops are used to generate the GUI automatically.
🛠️ Skills Required
  • Lists
  • Nested lists
  • for loop
  • Nested for loops
  • range()
  • len()
  • Tkinter Button
  • grid()
🎯 What You Learn
You learn how lists and loops can be used to generate a GUI automatically instead of repeating the same code. This is an important step toward writing shorter and more reusable programs.
🚀 Project Progress: GUI Window → Display → Buttons → Automatic Button Layout → Button Actions → Calculator
🖱️ Step 8 — Make the Buttons Work
📄 File: calculator_v8_GUI.py
💡 What We Improve

The calculator buttons now become interactive. When the user clicks a button, its value is inserted into the calculator display.

We also introduce a function that handles what should happen when a button is clicked.

New Concept — Event-Driven Programming: A GUI program waits for an event, such as a mouse click. When the event occurs, the associated function is called to perform an action.
🛠️ Skills Required
  • Functions
  • Function parameters
  • Tkinter callbacks
  • command=
  • lambda
  • display.insert()
  • tk.END
  • Nested loops
🎯 What You Learn
You learn how to connect a GUI button to a function using a Tkinter callback and make the calculator respond to user actions.
💭 Think About It: In a normal console program, Python generally follows the instructions from top to bottom. In a GUI program, the application waits for events such as button clicks and responds to them.
🚀 Project Progress: GUI Window → Display → Buttons → Automatic Layout → Interactive Buttons → Calculator Operations
🧹 Step 9 — Add the Clear Button
📄 File: calculator_v9_GUI.py
💡 What We Improve

The calculator can now clear its display using the C (Clear) button. The Clear button has its own function, while the number buttons continue to display their values.

New Concept: Different GUI buttons can be connected to different functions. Each function performs the action associated with its button.
🛠️ Skills Required
  • Functions
  • if and else
  • command=
  • Callback functions
  • display.delete()
  • tk.END
  • lambda
  • Loops
🎯 What You Learn
You learn how different buttons can be connected to different functions, allowing each button to perform its own specific task.
🚀 Project Progress: GUI Window → Display → Buttons → Button Actions → Clear Function → Calculator Operations
🧮 Step 10 — Perform Calculations
📄 File: calculator_v10_GUI.py
💡 What We Improve

The calculator can now perform actual arithmetic operations. When the user selects an operator, the program stores the first number and the selected operation. When the user presses the = button, the stored information is used to calculate and display the result.

New Concept: Information can be stored in variables during one button click and used later when another button is clicked. This allows separate GUI events to work together.
🔄 Calculation Flow: Enter number → Select operator → Enter second number → Press = → Display result
🛠️ Skills Required
  • Functions
  • Global variables and global
  • float()
  • if / elif / else
  • Arithmetic operators
  • try / except
  • ValueError
  • Tkinter callbacks
  • return
🎯 What You Learn
You learn how information can be stored between different button clicks and used later when the user presses = to perform a calculation.
🚀 Project Progress: GUI Window → Display → Buttons → Button Actions → Clear → Calculations → Complete Calculator
✨ Step 11 — Improve the Calculator Display and Error Handling
📄 File: calculator_v11_GUI.py
💡 What We Improve

We now improve both the calculator’s appearance and its behavior. The display is enlarged and styled, buttons are given different colors, and results are formatted more neatly.

For example, a whole-number result such as 5.0 can be displayed simply as 5. The program also handles invalid input and division by zero.

🎨 UI Improvement
Larger display, button styling, colors, borders, and window settings.
🛡️ Error Handling
Handle invalid input and prevent errors caused by division by zero.
🛠️ Skills Required
  • if / elif / else
  • try / except
  • ValueError and TypeError
  • Global variables and global
  • Type conversion using int() and float()
  • Tkinter widget styling
  • resizable()
  • relief and ipady
  • Button customization
🎯 What You Learn
You learn that GUI programming involves both functionality and user-interface design. A good application should not only work correctly, but should also provide clear feedback and handle common user errors.
🚀 Project Progress: GUI Window → Display → Buttons → Button Actions → Calculations → Styling & Error Handling
⌨️ Step 12 — Add Keyboard Support
📄 File: calculator_v12_GUI.py
💡 What We Improve

The calculator can now be operated using the computer keyboard as well as the mouse. Numbers, the decimal point, arithmetic operators, Enter, and Escape are handled through keyboard events.

⌨️ Keyboard Actions: Number keys → enter numbers  |  + * / → select operations  |  Enter → calculate  |  Escape → clear
New Concept: The bind() method connects keyboard events to Python functions. The program can therefore respond to keyboard actions, not just mouse clicks.
🛠️ Skills Required
  • Event handling
  • window.bind()
  • Event objects
  • event.char
  • event.keysym
  • if / elif
  • Functions
  • Keyboard events
  • return
  • KP_Enter
  • Escape
🎯 What You Learn
You learn how a GUI application can respond to keyboard events in addition to mouse clicks. This makes the calculator more convenient and interactive.
🚀 Project Progress: GUI Window → Display → Buttons → Calculations → Styling → Keyboard Support → Complete Calculator
⌫ Step 13 — Add Backspace
📄 File: calculator_v13_GUI.py
💡 What We Improve

The calculator now gets a Backspace (⌫) button and keyboard Backspace support. The user can remove the last character from the display without clearing the entire calculation.

We also adjust the button layout to accommodate the new Backspace button and make the calculator more convenient to use.

✏️ Example: If the display contains 1234 and the user presses , it becomes 123. The C button, on the other hand, clears the entire display.
New Concept: Strings can be examined and modified using functions such as get(), delete(), and len(). This allows us to remove only the last character.
🛠️ Skills Required
  • Functions
  • String manipulation
  • display.get()
  • display.delete()
  • len()
  • if
  • Keyboard event handling
  • window.bind()
  • lambda
  • Tkinter widgets
  • Nested loops
  • GUI layout
🎯 What You Learn
You learn how to combine Python programming concepts with Tkinter GUI features to create a more complete and user-friendly calculator application.
🏁 Final Version: The calculator now supports mouse and keyboard input, arithmetic operations, Clear, Backspace, error handling, and a styled graphical interface.
🚀 Project Complete: Console Calculator → Functions → Error Handling → GUI → Buttons → Calculations → Styling → Keyboard → Backspace
🏁 Conclusion

🎉 Congratulations! You have now built a Python calculator step by step—starting with a simple console program and gradually progressing to a functional GUI-based calculator using Tkinter.

Throughout this project, you practiced important Python concepts such as variables, input, conditions, loops, functions, exception handling, lists, and string manipulation. You also learned how to create a graphical application using Tkinter, buttons, widgets, layouts, callbacks, and keyboard events.

💡 The Big Lesson
The most important part of this project is that you did not jump directly into a complex application. Each version introduced a small improvement and a new programming concept.

By running and testing V1 through V13, you can see how a simple Python program can gradually grow into a complete application.

💻 Build  →  🧪 Test  →  ❌ Make Mistakes   →  🔧 Improve  →  🚀 Build Again
🌟 Keep practicing! Experiment with the code and try adding your own features. The best way to learn programming is to build, test, make mistakes, and improve. 🚀
🧮 Calculator Project: V1 Console Calculator → V13 GUI Calculator

Gopal Krishna

Hey Engineers, welcome to the award-winning blog,Engineers Tutor. I'm Gopal Krishna. a professional engineer & blogger from Andhra Pradesh, India. Notes and Video Materials for Engineering in Electronics, Communications and Computer Science subjects are added. "A blog to support Electronics, Electrical communication and computer students".

Leave a Reply

Your email address will not be published. Required fields are marked *

Translate »